The Creditors application is where creditor accounts are created and managed. Any company or person from whom goods or services are purchased must be set up as a creditor. This includes non-trade creditors—e.g., Stationery suppliers, Utility providers etc. Payment of suppliers is made from within the Creditors application
To access the Creditors Application, on the main Tourplan Menu click on Financial's in the side bar and then on the Creditors icon ![]() .
.
Screen Shot 89: Creditors Opening Screen
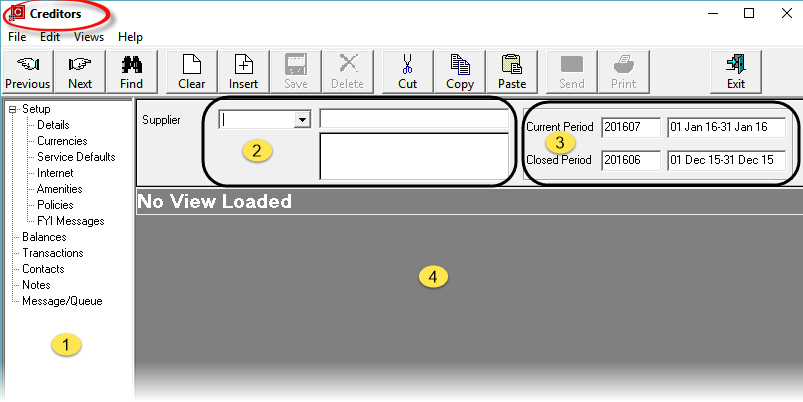
When the Creditors application is opened, the screen shown in Screen Shot 89 Creditors Opening Screendisplays. This sections in this screen are:
 Menu Tree. The Menu Tree allows access to all parts of the Creditors application
 Creditor Details. These three fields display the Creditor code, name and address details
 The Creditors Ledger current accounting period number and dates and the last closed accounting period number and dates.
 The work area which will become available once an existing Creditor is selected or a new Creditor is being created.
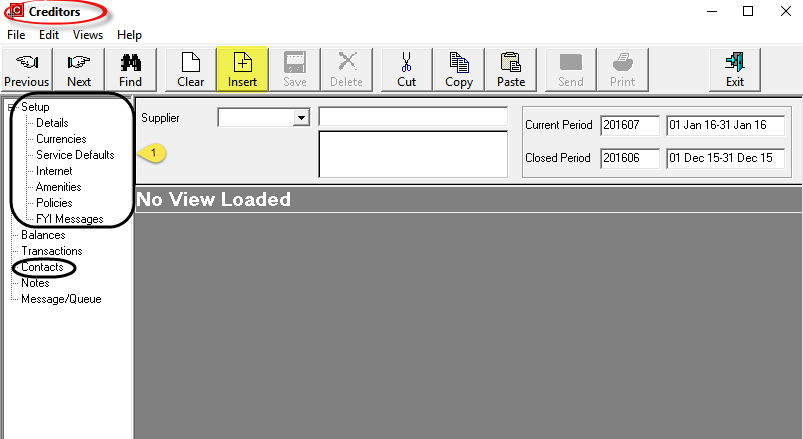
To insert a new supplier, click on the Insert button in the button bar. This will start a New Creditor Wizard which will step through the Creditor set up screens on a screen by screen basis.
Screen Shot 90: Insert New Creditor - Step 1

|
Creditors are also known as Suppliers or Vendors. In this document, the terms have the same meaning. |
To add an Creditor/Supplier, click on the Insert button  in the button bar. This will start a New Supplier Wizard which will step through the supplier set-up on a screen by screen basis. The screens which are accessed sequentially in the set-up wizard are those circled (
 ), plus the Contacts screen.

|
The new Creditor record is not saved until the Wizard has been completed. If the |
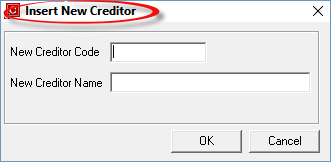
A small dialogue screen will overlay the main Supplier screen.
Screen Shot 91: Insert New Creditor Code/Name Dialogue

|
This dialogue box is also used to copy one supplier to another supplier. See Copy Supplier. |
New Creditor Code (6 Chars)
The code is alphanumeric and is used throughout Tourplan to quickly find and sort suppliers.

|
Always use 6 character codes for all suppliers to allow flexibility and consistency. If less than 6 characters are used, it can make searching for suppliers difficult, since the system will always find, alphabetically, the supplier with the least number of characters in the code. If possible, use alpha/numeric rather than numeric characters for Creditor/Supplier codes. This makes it easier for consultants to remember and use efficiently. There is constant debate about which is the best way to code suppliers. Tourplan makes no hard and fast rules. There is consensus that the locality (or an indication of the locality) of the supplier should be included somehow in the code. This is because there are often chain hotels in different cities so for example, the code HERHOT could not be used for Heritage Hotel when there may be more than one Heritage Hotel. So the coding structure HERAKL could be Heritage Auckland Hotel; HERCHC Heritage Christchurch Hotel and so on. Another point of discussion is whether the code should have the locality first or last—i.e., HERAKL or AKLHER. If this method is to be used, then use the former. It’s easier to find a supplier based on a portion of the name rather than the city and a portion of the name. In bookings, the consultant has the use of a location code for the service to assist with the search. Another method used is the first three characters of the code as an identifier for the supplier, and the last three characters as location/number—e.g., HERA01 meaning HER = Heritage; A = Auckland; 01 = the first Auckland supplier coded HER. |
New Creditor Name (60 Chars)
Enter the Supplier Name.
|
|
Click the OK Button to continue setting up the new supplier |
|
|
Click the Cancel Button to exit the New Supplier Wizard |
The Add New Supplier Wizard will step through the process of adding a new supplier as shown in the screens below:
Screen Shot 92: Insert New Creditor - Details Tab
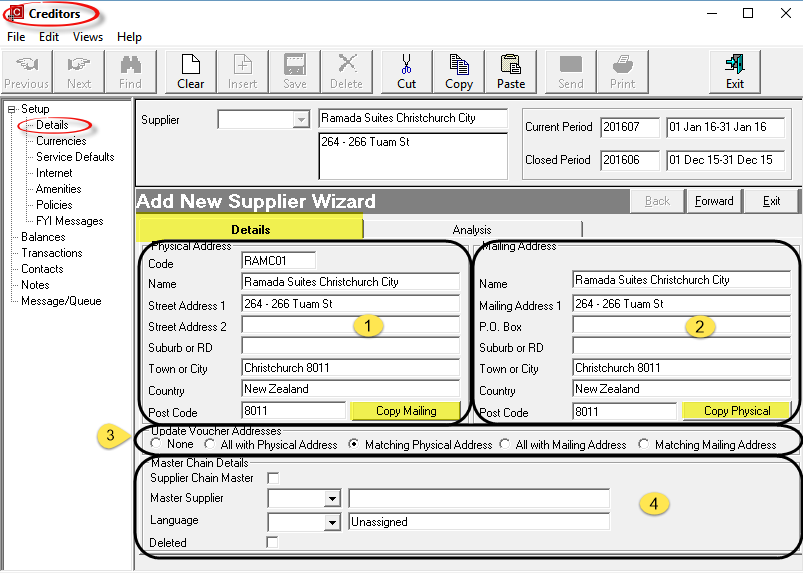
In the Details screen, there are two tabs - Details and Analysis.
The Details Tab opens after the supplier code and name have been entered.
 &
&  Address Fields
Two sets of Name/Address fields are available; Physical Address ( ) and Mailing Address (
 ). These can be different. Each field is 60 characters. When a new supplier is being created, what is entered into the physical address fields is replicated in the mailing address fields which can be overwritten if necessary. The 5 labels (Street Address 1 etc.) for both physical and mailing addresses can be user defined in the (AP) INI Maint application. In Screen Shot 92 Insert New Creditor - Details Tab above, what was Mailing Address 2 has been set up as P.O. Box.

|
It is imperative that consistency be maintained when entering address detail—i.e. always use the same line for the Street Address etc. |
The two Copy Buttons (Mailing & Physical) can be used to copy the address details from one section to the other if necessary.
 Update Voucher Addresses Section (Radio Buttons)
These checkboxes are used when address details of an existing supplier are modified. When the supplier is used in product(s) in the Tourplan Product Database, the physical address details are saved as the voucher address in the product. If the suppliers address details change, these radio buttons can be used to determine whether or not the address details in any products that the supplier is used in should also be updated. The choices are:
|
None |
Products will not be updated with new name or address details. |
|
All with Physical Address |
All Products that have this supplier’s physical address will be updated, regardless of the voucher address. |
|
Matching Physical Address |
Only products for this supplier that have the exact original physical address (before modifying) will be updated with the new name or address details. |
The same criteria are used for the All with Mailing Address and Matching Physical Address radio buttons.
 Miscellaneous Details
Supplier Chain Master/Master Supplier
Tourplan allows suppliers to have subsidiary suppliers. This feature means for example, that Cheque Remittance Advices detailing transactions for subsidiary suppliers can be sent (and the cheque made out) to the head office/master supplier. The transactions remain against the subsidiary supplier, with the physical documents only being made out to the master supplier.
Alternatively, the Master Supplier can be selected as the supplier that will have the transactions against it, and subsidiary suppliers’ services can be selected based on the Master Supplier. The payment is made to the master supplier. In this case, the transactions are against the Master Supplier.

|
These processing methods are covered later in this document (see Paying an Alternate Supplier). |
In order for this feature to work, the system has to know which supplier is the Master and which are the subsidiaries. If the supplier being entered is a Master/Head Office, then click the check box Supplier Chain Master. If the supplier being entered is a subsidiary of a Master (which must have already been entered and defined as a master), click the drop-down Master Supplier list and select the Master Supplier from the list. If the supplier being defined is not a master or a subsidiary supplier, leave both fields blank.

|
If payments are not required to be made to a Head Office/Master on behalf of subsidiary suppliers, then these fields can be left blank. |
Language (Drop-down)
The language code determines which document and message templates will be displayed when sending messages to this supplier. Language codes must first have been set up in the CodeMaint application. If foreign language documents or messages are not to be produced then leave this field as 'Unassigned'.

|
More detail on documentation language is in the System Setup Training Guide > Messaging Setup > Language (Codes). |
Deleted (Checkbox)
This flag can hide the supplier when bookings are made, so that consultants cannot use this supplier in a booking. The supplier is then only available for maintenance via this Creditors application.
Screen Shot 93: Supplier Analysis Screen
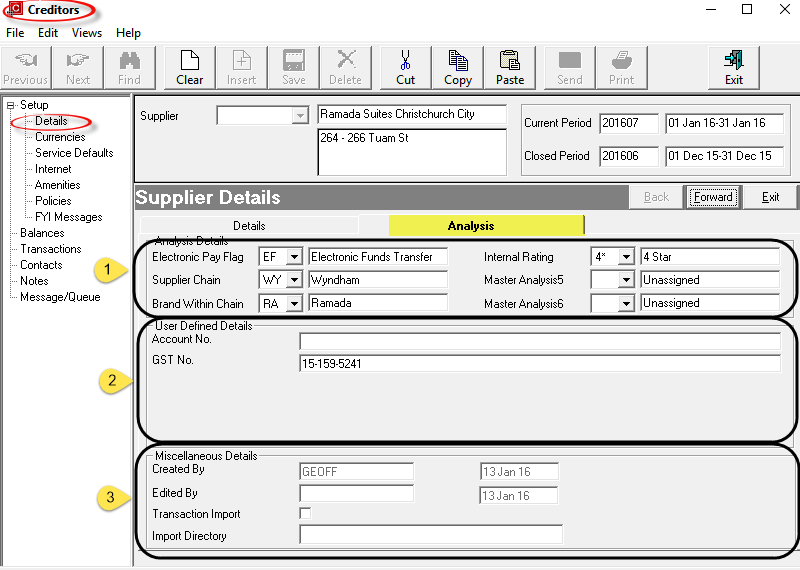
The Analysis Details Screen is accessed by clicking the Analysis tab and enables Analysis Codes and fields of user-defined text to be attached to the supplier.
 Analysis Details (Drop-downs)
There are 6 Supplier Analysis fields available. The labels for these 6 fields can be user-defined in INIMaint > System. If the labels have not been defined, they display as Analysis 1 etc. Once the labels have been defined, codes can be entered into the Analysis data tables via CodeMaint > Accounts Payable. If analysis codes are not going to be used, the blank value "Unassigned" should be used.
The Analysis fields can be used to select suppliers for inclusion in Supplier, Booking & Management reports.
The examples in Screen Shot 93 Supplier Analysis Screen above have been used as follows:
|
Analysis 1 |
Electronic Pay Flag |
Flag used during the payment process to indicate whether the supplier is paid by cheque or electronic funds transfer. |
|
Analysis 2 |
Supplier Chain |
The supplier chain (if any) that the supplier is part of. |
|
Analysis 3 |
Brand Within Chain |
The brand of supplier, within the chain described in Analysis 2 (if any) |
|
Analysis 4 |
Internal Rating |
Tour Operators own star rating of the supplier |
|
Analysis 5 |
Not Used |
|
|
Analysis 6 |
Not Used |
|
Note these are examples only.
 User Defined Details (60 Chars)
There are 5 user-defined text fields of 60 characters each which do not display on this screen until the text fields have been labelled in INIMaint.
These fields can be used as selection data and output in the Excel based Tourplan Financial Analysis and Operational Reports.
 Created By/Edited By
These fields display the date of the supplier creation in the system, and the name of the user who created the supplier and the date, and name of the user who last updated the supplier. These fields are non editable.

|
Click the Forward Button on the Wizard Bar to continue setting up the new supplier |
|
|
Click the Exit Button on the Wizard Bar to cancel the new supplier set up |
Screen Shot 94: Supplier Currencies Screen
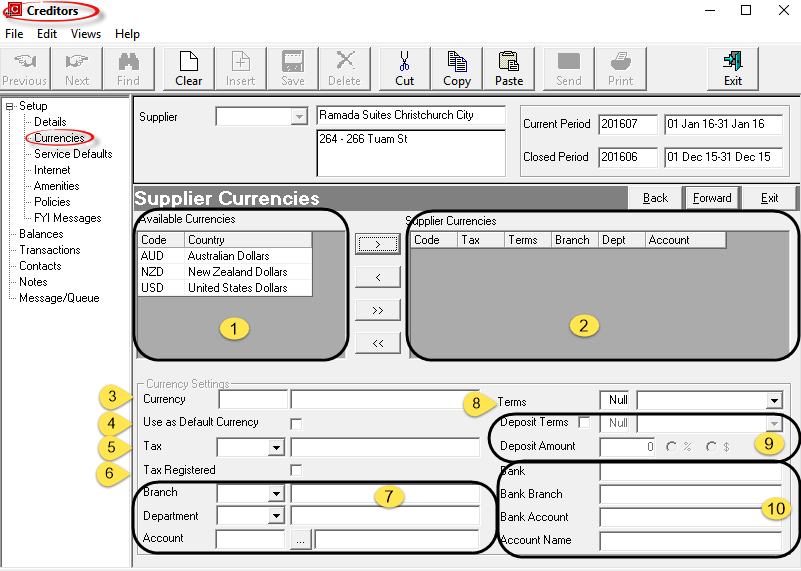
This screen enables Buy Currencies, Taxes, Default Expense Account, Payment Terms, Deposit Terms and Bank Account details to be set up for the supplier.
 Available Currencies
All currency codes that have been set up in the system display in this panel.
 Supplier Currencies
Currencies that are already attached to the supplier display in this panel.

|
Currency(s) can be added to the supplier by highlighting them (individually) and clicking the |

|
Do not add currencies that are not likely to be used by the supplier. This will only make reconciliation at the end of each accounting period more time consuming. Only currencies that the supplier is going to be paid in should be attached. |
When a currency is moved to the Supplier Currencies panel, the Currency Settings fields become live and can be completed.

|
Currency Settings must be defined for each currency attached to the supplier. Highlight the currency that the settings are to be completed for in the Supplier Currencies Panel. |
Currency Settings
 Currency
When a currency is highlighted in the Supplier Currencies panel, these two fields will display the code and country of the currency being worked on.
 Use as Default Currency (Checkbox)
Check this box when the currency that is going to be used most of the time for the supplier is highlighted. If more than one currency is attached to the supplier, at least one currency should be checked as the default. If there is no default, then the user will have to choose a currency each time a financial transaction is entered against the supplier. The default can be overridden at transaction entry time.
 Tax (Drop-down)
Available taxes that have already been set up in the CodeMaint application are available from the drop-down list. To attach a tax, highlight it.

|
Any tax which is attached in this field is only used when non-booking transactions are entered against the supplier. This tax is not used when calculating the taxes in a booking. Booking taxes are calculated on a service by service basis (allowing for service items that could be non-taxable) and the tax on mark-up and commission is calculated based on the Tax Indicator attached to the booking or booking agent. |
 Tax Registered (Checkbox)
When checked, the system will calculate any applicable input/output taxes (VAT/GST etc.) attached at either Creditor or Product level in the standard way. When unchecked, the tax is still calculated, but is not included in any payment to the supplier, nor posted to the Input Tax account.

|
'Non Tax Registered' does not mean Tax Exempt or Zero Rated. It simply means that the supplier does not file a GST/VAT return (and nor can they claim a tax credit on GST/VAT input paid). This means that the responsibility for the payment of the creditors portion of the GST/VAT falls on the company purchasing supply from them – i.e., the Tour Operator. |

|
This setting only applies to Input/Output (VAT/GST) tax transactions which are separated in the General Ledger. |
 Branch/Department/Account Drop-downs/Search)
These three fields can be used to attach a G.L. expense account that all expenses generated by the supplier can be posted to. This is only encouraged where the supplier is not a Booking Supplier—i.e., a sundry supplier, and will never be paid for bookings related expenses—e.g., Phone Company etc.

|
It is never recommended that expense G.L. Accounts be attached to booking suppliers. When supplier invoices are received for booking services they are matched to the voucher record for the service. This will then automatically post expenses to the G.L. Account set up in the INIMaint G.L. Settings which will allow bookings expense analysis to be made. Supplier expense analysis can be performed using the Excel Financial Analysis reporting tools, regardless of G.L. Expense Account postings. |
 Terms (Integer 4, Drop-down)
There are two fields which make up the payment terms for the supplier. The first is a numeric value which is either a) a number of days or b) a date in a month (depending on which setting is chosen from the drop-down list in the second field). Combined these are used to calculate the payment due date of a suppliers invoice transaction. The available options are:
|
nn days |
Prior to Travel |
|
nn days |
After Travel |
|
nn days |
After Invoice |
|
Date |
Of Following Month |
|
Date |
Of Current Month |
|
nn days |
Prior to Service |
|
nn days |
After Invoice Entry |
If the numeric value (nn) is (e.g.) 20, then the following would apply:
20 Days Prior to Travel
20 Days After Travel
20 Days After Invoice
20th of the Following Month
20th of the Current Month
20 Days Prior to Service Date
20 days After Invoice Entry

|
Any terms which are Prior to Travel or Service are included when the Deposit/Pre-payment processing function is run — see Accounts Training Guide – 2. |
 Deposit Terms (Checkbox/Integer 4/Drop-down)/Deposit Amount (Numeric 11.2/ radio button)
This combination of the Deposit Terms check box and drop-down is used to determine if a deposit or pre-payment is required to be made to the supplier. If the Deposit Terms box is checked, then the other fields are available for use.
The first field is a numeric value that indicates the number of days that the second field describes.
The numeric value (nn) applies as follows:
The Deposit Amount field is only available if Deposit Terms is checked and allows a value to be entered which is determined by the % or $ radio button. If the Deposit amount is (e.g.) 100.00 and the % radio button is checked, it means that a 100% deposit is required at the time specified by the nn Days value. If the $ radio button is checked, it means a deposit of $100.00 is required at the time specified by the nn Days value.
An Accounts Payable Report Pre-payment/Deposit Report is available to report deposit amounts and due dates, which is generated based on the values in the deposit fields.
 Bank/Bank Branch/Bank Account (30 Chars each/Account Name (60 Chars)
These fields can be used to store the supplier bank account details. The Bank, Bank Branch and Bank Account fields can be output on supplier messages and as well, the Bank Account field can be used in an Electronic Payment file. (To use the EFT feature, the bank’s EFT file processing software and the necessary internet connections to the bank are required.)
Screen Shot 95: Completed Currencies Screen Example
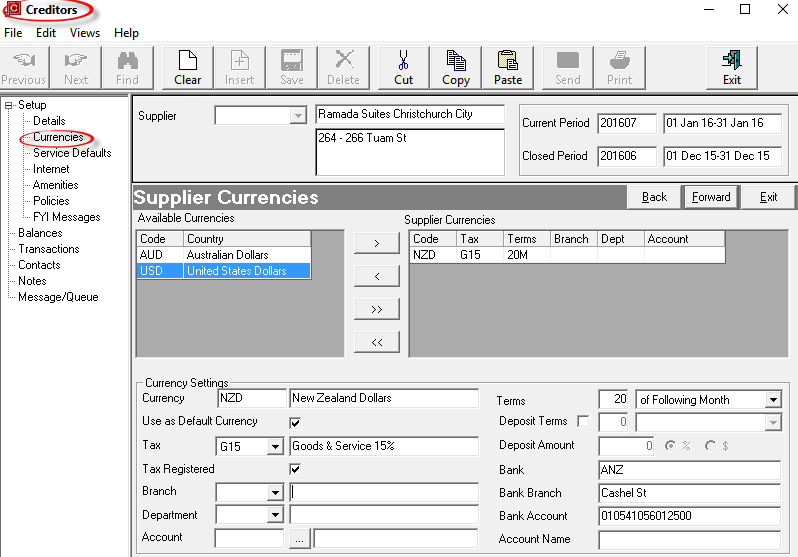

|
Click the Forward Button on the Wizard Bar to continue setting up the new supplier |

|
If any item on previous screens needs correcting, use the Back button on the Wizard Bar to go back. |
|
|
Click the Exit Button on the Wizard Bar to cancel the new supplier set up |

|
The Service Defaults node is not accessed as part of the new Supplier Wizard. It is not able to be accessed until the Wizard has completed and the supplier saved. The Service Default detail shown in this section does not relate to the supplier being set up as the new supplier example (RAMC01) - it is the service defaults of an existing rental vehicle provider. |
Service Defaults allow alternative locations and addresses to be stored against suppliers that have multiple pick-up and drop-off locations, (e.g. Rental Vehicle operators).

|
Service Defaults are often mistakenly set up against Master Suppliers - e.g. a hotel chain head office. This is an incorrect use of the feature - a hotel stay can not commence in one location and finish in a different location. In the case of hotel chains, each property is set up as a separate supplier - e.g., Ramada Christchurch, Ramada Orewa. In the case of rental vehicles, there is one supplier (and reservations office) providing the service in multiple locations. |
The first condition to consider before setting up the Service Defaults is that the supplier that is having the pick-up/drop-off points added is the supplier—i.e., for the example being shown, Budget Rent A Car is the supplier, and they only have pick-up/drop-off locations at other cities, not reservations and accounting offices. In the Product Database, the service(s) will be set up with the generic location (e.g.) NZL (New Zealand). In bookings, the alternative locations set up under the supplier Service Defaults —AKL, ROT, CHC, etc.—can be used to find and book the service(s).
The benefit of this feature is that Rental Vehicles etc. only need to be set up in the Product Database at one generic location, but in bookings, the actual pick-up and drop-off locations can be specified which means documentation etc. is showing the correct detail.
Screen Shot 96: Supplier Service Defaults Screen
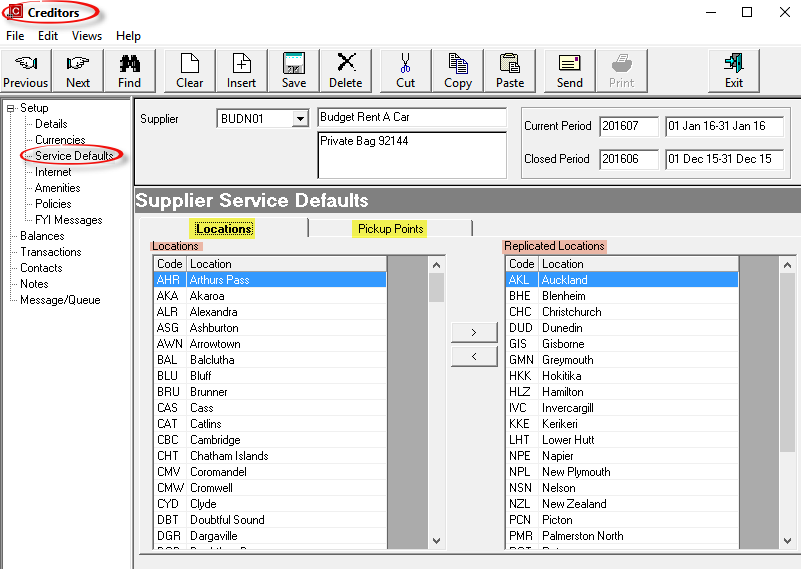
When Service Defaults is first accessed, two tabs display - Locations and Pickup Points. The left hand tab Locations has two panels - on the left hand side is a list of Service "Locations" as set up in CodeMaint > Locations, and on the right hand side is the panel headed "Replicated Locations". The suppliers pick-up/drop-off locations can be highlighted (individually) in the Locations Panel and moved to the Replicated Locations column on the right by clicking the  button.
When all required Pickup and Dropoff locations have been added to the Replicated Locations panel, click on the Pickup Points tab to add pick-up/drop-off addresses.

|
The generic location of the Service Option (NZL in this example) must also be added to the replicated locations. |
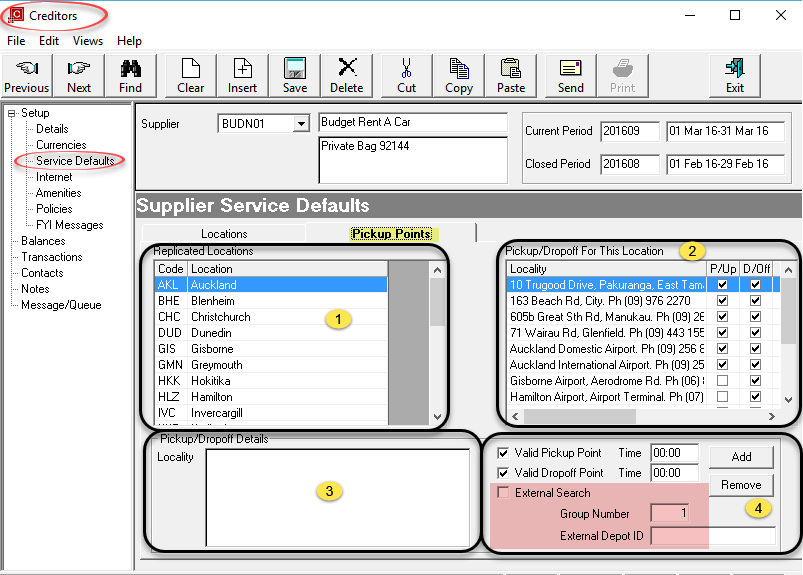
Screen Shot 97: Locality Pick-up/Drop-off Details

|
The generic location of the Service Option (NZL in this example) must also be added to the replicated locations. |
There are 4 sections to this screen.
 Replicated Locations
The locations which display in this panel are those that were moved (in Screen Shot 96 Supplier Service Defaults Screen) from the Locations list to the Replicated Locations list.
 Pickup/Dropoff For This Location
This panel displays the list of pickup and dropoff points for the location which is currently highlighted in the Replicated Locations panel ( ) - in this example AKL - Auckland. Note that for the 6 locations at the beginning of the list are all Budget depots in the Auckland area and so pickup and dropoff is available at those depots. The two cities below them (Gisborne & Hamilton are drop off locations only - i.e., one way hires are permitted between those locations.
 Pickup/Dropoff Details
Locality (240 Chrs)
Enter the address and contact details for the pickup/dropoff point in this field.

|
When used in Quotes/Bookings, the locality addresses are automatically available as valid pick-up/dropoff points which can be used in client documentation. |
 Pickup/Dropoff Point Indicators
Valid Pickup Point (Checkbox)
If the address and contact details are a pickup point, check this box
Time
If the pickup point is for (e.g.) a scheduled service, then the departure time can be entered here and it will automatically default into bookings
Valid Dropoff Point (Checkbox)
If the address and contact details are a dropoff point, check this box.
Time
If the dropoff point is for (e.g.) a scheduled service, then the arrival time can be entered here and it will automatically default into bookings

|
The 3 shaded fields External Search, Group Number and External Depot ID are used by the External Supplier Adapter to provide required detail to rental vehicle company systems. These should be left blank unless the adapter is installed and being used. |

|
Click the Forward Button on the Wizard Bar to continue setting up the new supplier |

|
If any item on previous screens needs correcting, use the Back button on the Wizard Bar to go back. |
|
|
Click the Exit Button on the Wizard Bar to cancel the new supplier set up |
The Internet Details screen provides fields for a Login and Password which can be used by the supplier to login to Tourplan via the Internet and Tourplan Supplier Connect to update rates and availability (for their own services only).

|
Using Supplier Connect and the ability for suppliers to update their rates and availability is not covered in this training guide. The software required for this is an additional add-on. This is a specialist topic and is covered when the software is installed. |
Screen Shot 98: Internet Details Screen
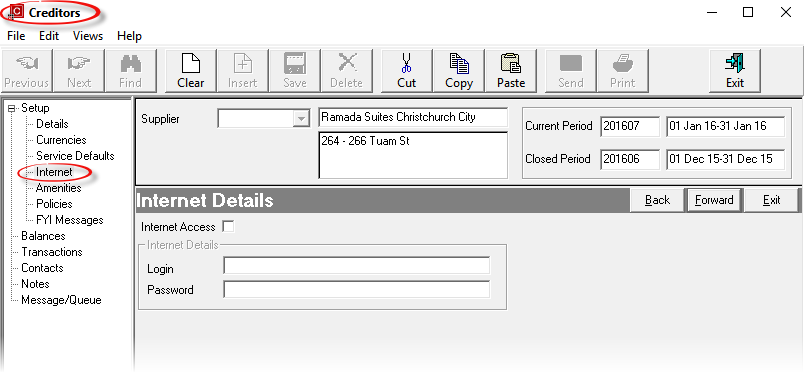
Internet Access (Checkbox)
This box must be checked to enable the Login and Password fields to be active.
If Supplier Connect is not being used, then leave all fields blank.

|
Click the Forward Button on the Wizard Bar to continue setting up the new supplier |

|
If any item on previous screens needs correcting, use the Back button on the Wizard Bar to go back. |
|
|
Click the Exit Button on the Wizard Bar to cancel the new supplier set up |
Amenities or facilities offered by suppliers can be set up (in CodeMaint > Database >Amenities) and attached at both supplier level and/or product database level. This caters for the situation of a supplier—e.g. a hotel—having some amenities that are common to all room types—e.g., 24 Hr. Reception, Heated Pool, Baby Sitting Available etc., and others that apply per room type - e.g. Cooking Facilities.

|
Having amenities set up is not critical to the operation of Tourplan — it will function without them. Supplier and product set up can continue without them; they can be added at a later stage if required. |
Attaching the amenities at the Creditor level is a simple process of select and move.
Screen Shot 99: Suppliers–Attach Amenities Screen
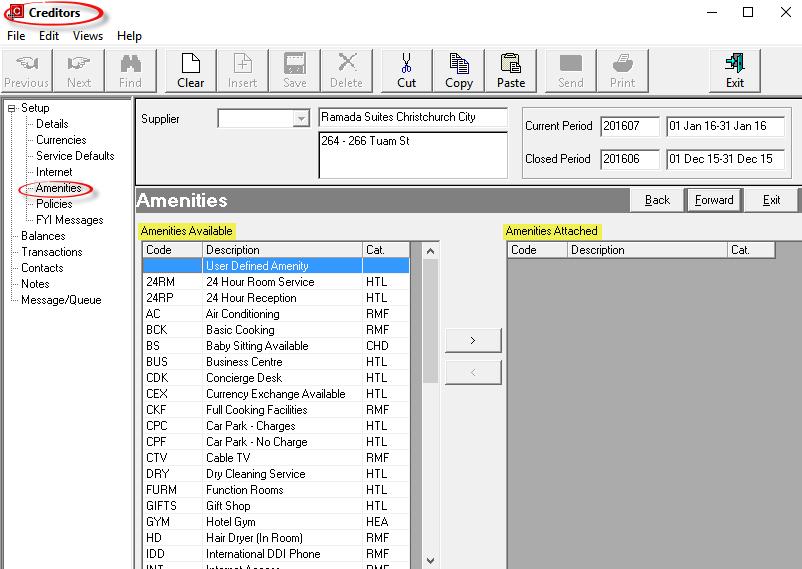
The list of all amenities loaded via CodeMaint will display in the Amenities Available panel.
To attach an amenity, highlight it and use the  arrow button to move it to the Amenities Attached panel on the right hand side of the screen. To remove an amenity from a Supplier, highlight the entry to be removed in the Amenities Attached list and click the
  arrow button.

|
The Amenities available list, on the left hand side, can be sorted by the three column headings, either by Code, Description or Category by double clicking on the heading. |
There is an entry at the very top of the Amenities available list named User Defined Amenity. This can be used to add a one off amenity if necessary. For example, if there is an item of 24 Hour Casino and this affects only one supplier, then rather than adding this once only item via CodeMaint, it can be added as an extra to the Creditor and/or product only.
To add additional amenities that have not been included in the list, attach the User Defined Amenity and then type in the description required. Then select the Category from the drop-down to the right of the description.
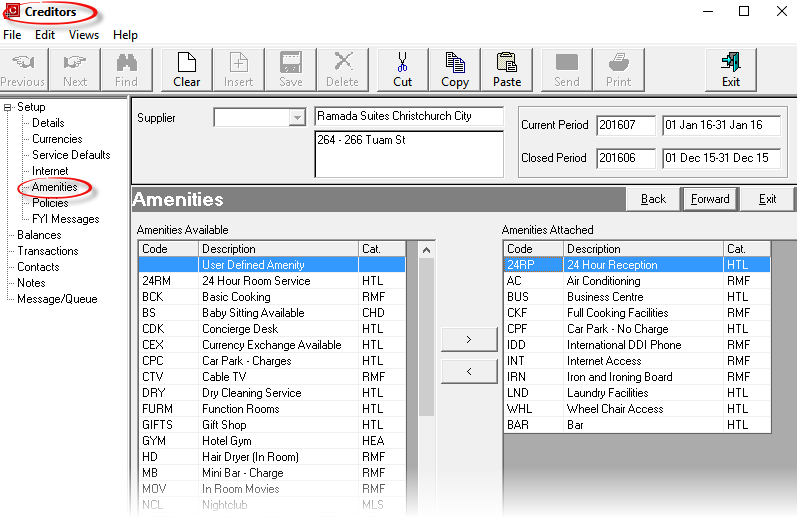
Screen Shot 97: Completed Supplier Amenities Screen below shows a completed Amenities Screen.
Screen Shot 100: Completed Supplier Amenities Screen

|
Click the Forward Button on the Wizard Bar to continue setting up the new supplier |

|
If any item on previous screens needs correcting, use the Back button on the Wizard Bar to go back. |
|
|
Click the Exit Button on the Wizard Bar to cancel the new supplier set up |
Policies help with making the correct selection and correct costing of services when inserting products into bookings. Policies can be set at the supplier level or the product Level.
Supplier "general" policies are defined in Creditors; "product specific" policies are defined in the Service Option/Product.

|
Having policies set up is not critical to the operation of Tourplan — it will function without them. Set up can continue without setting them up; they can be added at a later stage if required. |
Screen Shot 101: Creditor Policies Screen
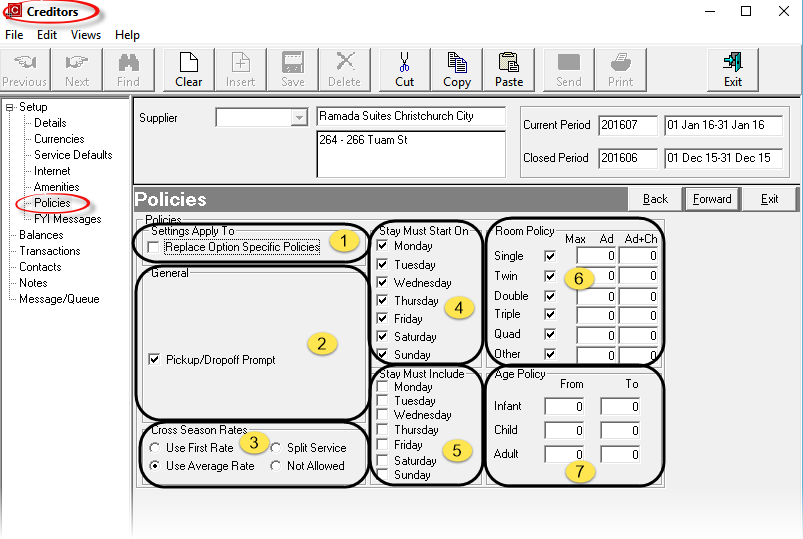
There are 7 distinct areas to the Policies Screen
 Settings Apply To
Replace Option Specific Policies (Checkbox)
This checkbox is un-checked by default. This should only be checked if the policies of all product service options created for this supplier need to be replaced with the supplier specific policies being entered in this screen.
 General
Pick-up/Drop-off Prompt (Checkbox)
This flag is to control if the Pick-up/Drop-off tab is visible at the time of inserting a service into a booking or PCM. It can also be used in conjunction with an INI Switch (PUDO_WARNINGS in FastBook, GroupBook and PCM) to have a prompt message appear at the time of insert to advise that pick-up/drop-off details have not been completed.
 Cross Season Rates
If a service crosses two or more seasons and is entered into a booking for dates which cross the season boundary, a Manual Rate Entry overlay box stating “Service rate crosses season” boundary displays.
The rate proposed will depend on the Cross Season Rates settings described below.
|
Use First Rate |
This setting will force the rate to be based on the first season for the duration of the service. A good example of this setting is rental cars. Most rental car companies charge the rate which is valid for the first day of the rental for the duration of the rental, regardless of any season boundaries during the hire. |
|
Use Average Rate |
This is the default setting when a new supplier is defined. This setting will take into account what the rates are across the season boundaries of the selected dates and then average the rate for the duration of the service. |
|
Split Service |
This setting will split the service in multiple service lines, one for each season crossed. Assume a service has week rates from Monday to Friday and weekend rates for Saturday. If the service is booked for 4 nights starting on Friday, Tourplan will automatically create 3 service lines, one for the week rate for Friday, one for the weekend rate for Saturday and Sunday and one for the week rate for Monday. Note that NO Manual Rate Entry overlay box displays on Split Service entry. |
|
Not Allowed |
This setting will not allow the service to be booked. An example of this could be a stay/pay deal that is only for a specific period and not allowed outside these dates. A system message “Cross Season Rates not allowed for this Price Code” will appear. |
 Stay Must Start On (Checkboxes)
When a new supplier is defined, all the days of the week are checked by default. This would mean that services created for the supplier can start on any day of the week.
If the first day of a service must start on a particular day or days, only check the relevant start day or days and remove the check mark from the other days.

|
When attempting to insert a service into a quote or booking which does not start on the correct day, following system message will appear and the service cannot be used. |
Screen Shot 102: Incorrect Start Day Message
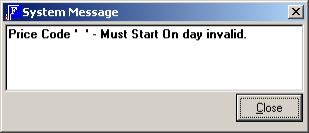
 Stay Must Include
When a new supplier is defined no days are checked. This indicates that services created for the supplier do not have to include any specific day.
If the service(s) for the supplier must start on a specific day, check the day or days of the week to force these days to be included when a service that uses this supplier is inserted into a quote or booking.

|
When attempting to insert the service into a quote or booking and the required day is not included in the stay following system message will appear and the service cannot be used. |
Screen Shot 103: Incorrect Stay Must Include Message
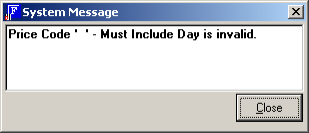
 Room Policy
When a new supplier is defined, all room types will be selected by default. This means that services created for the supplier can be booked for any possible room type.
Remove the check from a particular room type to exclude that room type.

|
If a service is inserted into a booking that has a room type which is not available, the following system message will appear. Entry of the service is denied. |
Screen Shot 104: Incorrect Room Type Message
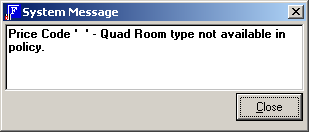

|
Note that room type Other is only used by FastBook (FIT Bookings), not GroupBook. |
If a room type is available, then the room occupancy values - Max Ad and Ad+Ch - are tested.

|
Room occupancy values are only valid for FastBook; when a service is entered in GroupBook the room occupancy is not checked against the values set in Room Policy. |
When a new Creditor is defined, the room occupancy values default to zero. This would mean that services created for the supplier can be inserted into FastBook based on standard rooming rules.

|
Only FastBook allows the entry of more passengers in a room than would normally be allowed in that room type. For example, in FastBook it is possible to enter 8 adults in a twin room if the policy room occupancy values are zero; in GroupBook this is not possible. If 8 adults are entered into a twin room, the system counts them as 2 adults plus 6 additional adults. |

|
If a room occupancy value is not zero, this value will be checked against the passenger number when a service is booked. If the booked passenger number is higher than the occupancy value, the following system message will appear. |
Screen Shot 105: Incorrect Numbers in Room Message
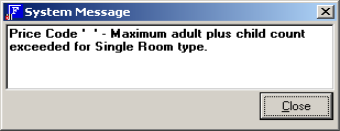
Enter the number of adults in the first column and the number of adults plus children in the second column.
Screen Shot 106: Room Policy Example
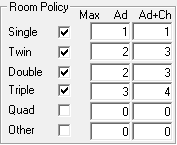
For this room policy configuration, the following would be able to be booked:

|
If a room occupancy value is not zero, this value will be checked against the passenger number when a service is booked. If the booked passenger number is higher than the occupancy value, the following system message will appear. |
 Age Policy

|
Age policy is only available for FastBook (FIT Bookings). |
When a new supplier is defined all age values are zero.
Ages for children and infants entered in FastBook Pax Travelling are checked against the Age Policy.

|
If the Age Policy is zero, ages are not validated. |
Screen Shot 107: Example Policy Screen Completed.
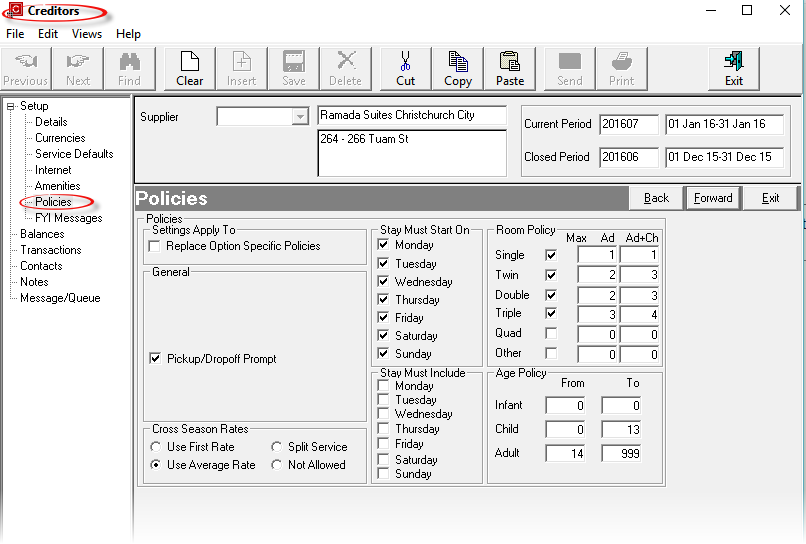
A service entered in a FastBooking with the above Age Policy will be costed as follows:
If an infant is in a booking, the system will apply the child price, since there is no infant age policy specified.
If a child is between 0 and 13 years at date of service, the system will apply the child price.
If a child is older than 13 years at date of service, the system will treat the child as an adult and based on the room type being shared following will happen:
Child ages are entered in bookings in the FastBook Pax Travelling Screen.

|
Click the Forward Button on the Wizard Bar to continue setting up the new supplier |

|
If any item on previous screens needs correcting, use the Back button on the Wizard Bar to go back. |
|
|
Click the Exit Button on the Wizard Bar to cancel the new supplier set up |
This facility enables simple notes to be set up against a supplier that can be used as a prompt for consultants processing quotes and bookings and can also be set up to display to agents making bookings using webConnect.
FYI messages can be used for a variety of reasons, e.g., a prompt to let the booking consultants know that a property is being refurbishedt, or perhaps to let consultants only know that a deposit is required when a particular supplier is booked.
To enter an FYI Message, click the Insert button  on the Button Bar.
Screen Shot 108: FYI Message Setup
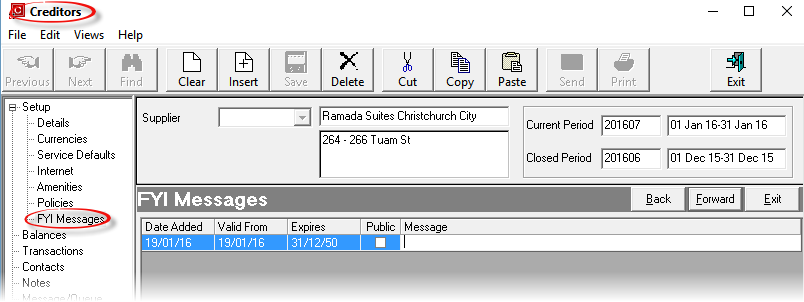
Date Added (Date)
This defaults to the system date. It cannot be altered.
Valid From (Date)
The date that the message is valid from.
Expires (Date)
The date that the message expires and will no longer show. If the validity if the message needs to be extended, it can be by changing the date in this screen.
Public (Checkbox)
When checked, this check box allows the message to display to agents via webConnect.
Message (128 Chars)
Free format text.
The message will display in bookings provided the Service Date falls between the Valid From and Expires dates. If there are multiple messages for the same period, they are able to be scrolled through.

|
Click the Forward Button on the Wizard Bar to continue setting up the new supplier |

|
If any item on previous screens needs correcting, use the Back button on the Wizard Bar to go back. |
|
|
Click the Exit Button on the Wizard Bar to cancel the new supplier set up |
This screen enables contacts to be added, changed and deleted for a supplier. Supplier contacts are used in Tourplan’s messaging system to provide an automated phonebook when messages are sent by email or fax to a supplier. Prior to the set-up of a contact, a list of standard contact types must be set up in the CodeMaint application.
Screen Shot 109: Supplier Contacts Screen
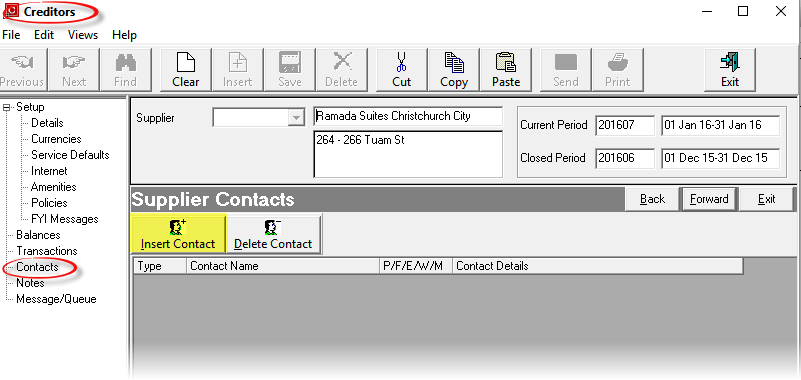
To add a contact click on the Insert Contact button. The Contact Details dialogue displays.
Screen Shot 110: Supplier Contacts Details
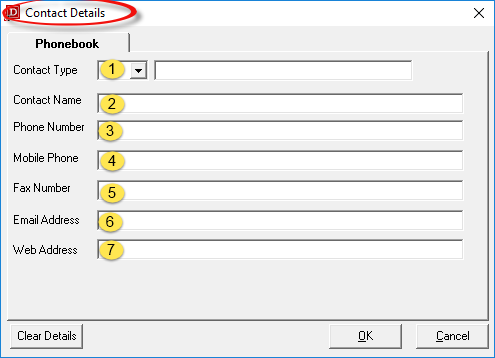
 Contact Type (Drop-down)
The type of contact.
Examples are: AC – Accounts; SA – Sales; RS – Reservations; AD – Administration etc. These must first be set up in CodeMaint > Messaging > Contact Types.

|
Contact Types can be used multiple times in this screen - e.g., there can be more than one contact with a Contact Type of 'RS' (Reservations), provided the Contact Name is different for each contact. |
 Contact Name (60 Chars)
The name of the contact. E.g. Alec Brown. Generic names can also be used—e.g. Reservations, Accounts etc.
 Phone Number (40 Chars)
The phone number for this contact. The number may be different to other contacts at this supplier.
 Mobile Phone Number (40 Chars)
The mobile phone number for this contact. The number may be different to other contacts at this supplier.
 Fax Number (40 Chars)
The fax number for this contact. The number may be different to other contacts at this supplier.
 Email Address (60 Chars)
The email address for this contact.
 Web Address (60 Chars)
The web address for the supplier (optional).

|
When the above entries have been completed, click the OK button to save the contact details. The Contact Name field will be cleared and details of the next contact for this supplier can be entered. Phone, fax, email and web details are retained, but can be overridden if necessary. |

|
Fax and email details can be used by the Tourplan messaging system to send messages to the agent. In the case of faxing, additional Tourplan compliant fax software is required. If faxing is to be used, then the fax number must be entered in the format that the faxing software requires. |

|
When entries of all contacts for this supplier have been completed, click the Cancel button to return to the Supplier Contacts Screen where a list of the contacts is now displayed. |
Screen Shot 111: Example Completed Contacts Screen
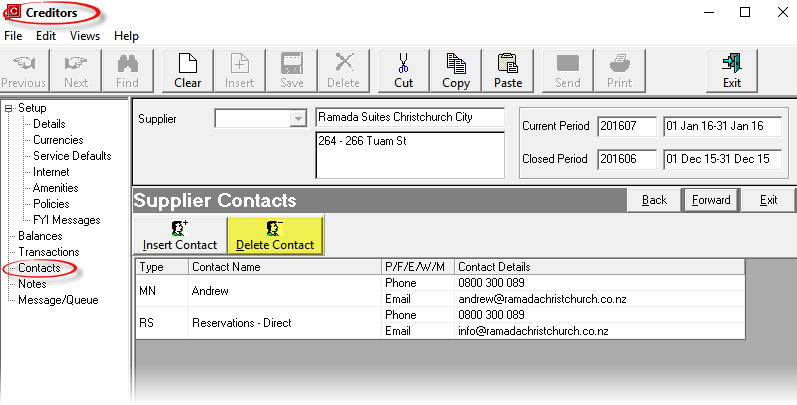
To change the details of a contact, double click the contact and edit the fields as required.
To delete a contact from this list highlight one of the listed contacts, click the Delete Contact button (highlighted yellow above) and click the Ýes' button when prompted.

|
Click the Forward Button on the Wizard Bar to continue setting up the new supplier |

|
If any item on previous screens needs correcting, use the Back button on the Wizard Bar to go back. |
|
|
Click the Exit Button on the Wizard Bar to cancel the new supplier set up |
This screen enables free format notes (or graphics) to be entered against a supplier.
Prior to entering supplier notes, Supplier Note Categories or Database Supplier Note categories must be set up in the CodeMaint application.
Screen Shot 112: Supplier Notes Screen
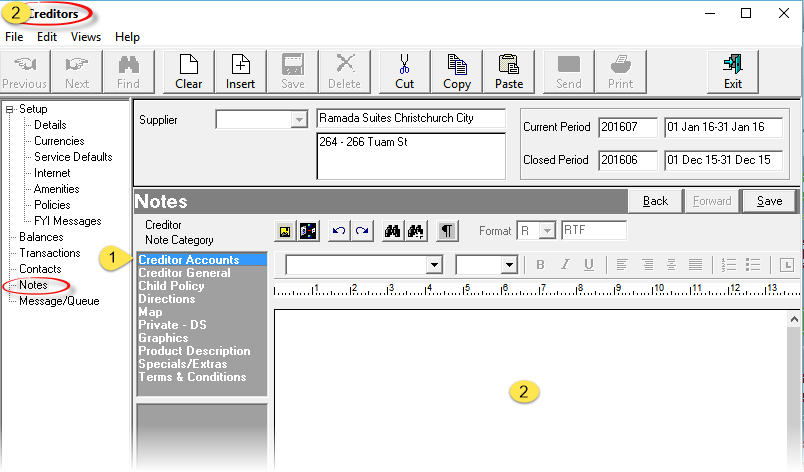
In the above example there are several categories of notes, and these are designed to hold different types of information about the supplier.
|
Creditor Accounts |
This category is designed for in house general notes - specifically accounts related. Not able to be viewed in bookings or product database. |
|
Creditor General |
This category is designed to hold general notes regarding the supplier. Not able to be viewed in bookings or product database. |
|
Child Policy |
Note describing child policy. Also able to be viewed in bookings and product database |
|
Directions |
Note showing supplier address details and street directions. Also able to be viewed in bookings and product database. |
|
Map |
Map graphic showing supplier location. Also able to be viewed in bookings and product database. |
|
Private - DS |
A general note visible in bookings and product database, but designed not to be included in or output on messages or documentation. |
|
Graphics |
Photo's etc of the suppliers business. Also able to be viewed in bookings and product database. |
|
Product Description |
A general description of the suppliers activity/business. Also able to be viewed in bookings and product database. |
|
Specials/Extras |
Details of any specials or extras that may be on offer. Also able to be viewed in bookings and product database. |
|
Terms & Conditions |
A text note detailing the payment terms with the supplier. Also able to be viewed in bookings and product database. |
All of the above notes are able to be viewed in Creditors/Suppliers, and those noted as being able to be viewed in bookings have been defined in CodeMaint as "Database Supplier Notes". This means they are available to view in Bookings, Database and Creditors. A note category which is defined as a Database Supplier Note will attach to all service options which are created for the supplier.
If a note category displays that is not applicable to the supplier, leave the note blank.
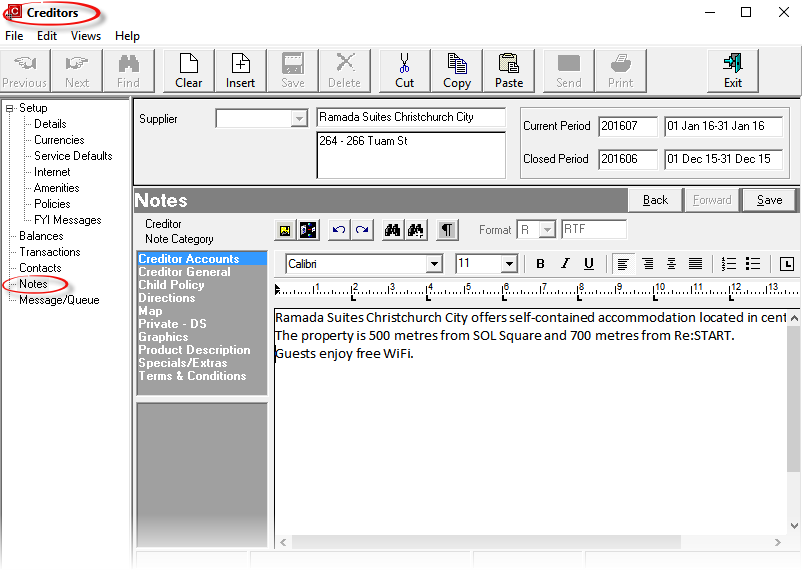
To enter a note, first highlight the required note category  from the list then click in the Editor window
  and type a note. An alternative is to copy/paste information from the supplier’s website or other source and edit it accordingly.
A Database Supplier Note type can also be created/edited in the Service Options Database, and any changes/additions will display in creditors.
Screen Shot 113: Example Completed Note

|
Click the Save Button on the Wizard Bar to complete setting up the new supplier |

|
If any item on previous screens needs correcting, use the Back button on the Wizard Bar to go back. |
A supplier’s details can be copied to another supplier.
While the details of the original/source supplier are loaded, click the Insert button  on the button bar.
Screen Shot 114: Copy Supplier Dialogue
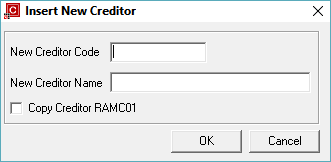
The Insert New Supplier dialogue (the same as in Screen Shot 91 Insert New Creditor Code/Name Dialogue) displays. There is an additional check box which can be checked if the supplier currently loaded is to be copied.
Enter the New Creditor Code and New Creditor Name. To copy the currently loaded supplier, ensure the check box is ticked. Click the OK Button  and the supplier will be copied. Any detail that needs to be edited/changed can be accessed via the side bar menu.